


How To Charge A Battery With Solar Panels?


Portable solar panels have become valuable additions to outdoor kits in recent years to recharge batteries when conventional power supplies are not available. At BougeRV.com, we have spent years developing the finest-quality portable solar panels on the market that combine the latest technology while offering a better price point than our competition. One of the more frequent questions that we get is how to charge a battery from a solar panel.
While it might seem straightforward, understanding the correct way to use solar panels for charging requires that the connections are made correctly. Failure to wire a solar panel correctly can damage the battery or panels or even a fire.
This guide will show you precisely what you need to do to properly wire up any of our top-selling solar panels to charge a battery without household power.
Solar Panel Wiring
When getting down to charge a battery from solar panels, the first thing we should know is the basic knowledge of how to wire the battery with the solar panels. Simply, it comes in 2 steps:
1. Connect the battery terminal to the charge controller. Connect the battery’s positive terminal to the positive battery terminals of the charge controller. Then, connect the battery’s negative terminal to the charge controller’s negative terminal.
2. Connect the solar panel to the charge controller. Hook up the solar panel's positive terminal to the charge controller's positive end. Then, connect the solar panel's negative terminal to the charge controller's negative end.
After the wire, you can monitor if the battery is charging from the controller. And in BougeRV, all our solar charge controllers have LCD screens, so you can easily check the charge at a glance!

How To Charge A Battery With Solar Panels?
Method 1: DIY Battery To Charge From Solar Panel
Step 1: Install Charge ControllerThe most basic way to use a solar panel to charge a 12-volt battery uses a device commonly called a Pulse Width Modulation (PWM) charge controller. PWM controllers operate at near battery voltage to provide a safe and stable charge without overheating the battery.
The controller must be placed somewhere that does not get wet and that there is no chance of accidentally tripping over wires or knocking the controller to the ground.
Step 2: Connect the Wire To Your BatteryThe PWM charge controller will include battery positive (+) and battery ground (-) wires. The cables plug into the charge controller and are routed to the battery terminals. As a general rule of thumb, always connect the battery positive first, then the negative.
When disconnecting cables, reverse the order so that the negative cable is taken off first. This helps to prevent accidental arcing that can cause electrocution and possible damage to equipment or injury to the operator.
It is very important to ensure the battery terminals are clean and free of corrosion. Corrosion on the terminals can prevent the battery from charging and may even cause a fire. Use an appropriate battery terminal cleaning brush that is available at any auto parts store.
Step 3: Slide The Wire Ends Into The Charge Controller’s Input PortsRoute the charging cables so they are clear of brush, water, and other hazards that could result in a fire. The end terminals on the cables will plug into the charge controller output ports. Make sure the cables seat fully and are free of dirt and debris before making the connection.
Step 4: Use MC4 Connectors To Connect The Wires To The Charge ControllerSolar panels use a unique type of plug end called an MC4 connector. This is a two-pin connecter with a rubber seal and a latch that prevents the wires from disconnecting.
Step 5: Connect Controller to Solar PanelThe final connection you make is to connect the solar panel array to the charge controller. This is always done last to prevent accidental voltage spikes and to protect the charge controller. Make sure that the connectors are clean before making the connections.
Step 6: Check The Output On The Charge ConnectorThe charge controller display will show the current charge level. If the input voltage is too low, you may need to reposition the panels or verify that the connections are secure and correct. If one of the wires is not correctly attached, start over to make sure that power is correctly routed to the battery.
Step 7: Charge Battery from Solar PanelThis is the easy part -just sit back and relax while the sun’s rays do all the work. Many modern PWM controllers feature overcharge regulators that operate like a switch. When the voltage from the panels is too high for the battery, the switch shuts off the flow of power and prevents overcharging the battery.
Method 2: Use MPPT Charge Controller

Maximum Power Point Tracking (MPPT) charge controllers have become more available in recent years and are the most popular way to convert energy from photovoltaic panels to charge a battery.
You will find MPPT controllers on all of the most popular solar generators because they improve charge rates by optimizing the voltage from the panel. The result is a more efficient charging system. Connecting an MPPT controller works in the same fashion as a PWM controller.
Step 1: Check the Solar Panel WattageBefore you buy an MPPT charger, you will want to know the total possible wattage of solar panels you are using. This figure will determine which MPPT controller is best for your application.
Step 2: Determine The Charge Controller AmpsTo safely charge a battery with solar energy, you need to figure out what the maximum amperage of the controller needs to be. You factor this calculation by dividing the total wattage of the solar array by the total voltage of the battery.
For example, a 200-watt solar array and a 12-volt battery give you an amperage of 16.6 amps (200w/12v=16.6a). You will need a charge controller with at least a 16 amp rating.
Step 3: Select An MPPT Charge ControllerThe final step is to select the best MPPT controller for your needs. BougeRV.com offers a range of advanced MPPT controllers to suit your needs.
What Is A Charge Controller?
A charge controller does just what it sounds like -it controls the incoming voltage from one power source to optimize for the receiving device’s voltage. Without a charge controller, there would be no regulation of the flow of electricity into the battery. Think about it like a dam on a river. Without the dam, the river rises and falls on its own. The dam regulates the flow of water, preventing destruction downriver.
The solar array produces unregulated voltage up to a maximum capacity. A battery only has just so much capacity and providing a charge voltage that is too high can cause unpredictable results. We have seen lead-acid batteries explode due to overcharging.
Types Of Charge Controller
Above, we briefly discussed the differences between PWM and MPPT controllers. BougeRV.com produces the finest-quality controllers on the market because we take safety seriously. Our lineup of solar charge controllers includes both MPPT and PWM controllers that pair perfectly with our extensive selection of solar panels.
These controllers are the most popular with BougeRV.com customers:
MPPT Charge Controller

We build our MPPT controllers to provide the most efficient charge possible. We offer two variations of our top-selling 40A MPPT controllers. Our controller for semi-permanent installations in motorhomes, trucks, and cars includes an external LCD screen that mounts in a convenient location.
We also offer a portable MPPT controller ideal for camping, picnics, and backyard barbecues that features a built-in LCD display. Our portable design can recharge a battery bank up to 48 volts.
Another popular model is the 60 amp MPPT controller which includes built-in Bluetooth connectivity. With Bluetooth, you can remotely monitor the charge on your battery bank from up to 33 feet on the app which also provides historical charge data, live parameter settings, and real-time feedback. This is the perfect charge controller for LiFePO4 batteries, Gel batteries, and all types of lead-acid batteries up to 24 volts.
PWM Charge Controller

Our PWM charge controllers are affordable, reliable, and better fit for smaller solar panels, making them popular with outdoor adventurers and RVers. Some of our customers use PWM controllers for long-term battery maintenance for classic cars and heavy equipment that isn’t used often.
We offer 10 amp, 20 amp, and 30 amp PWM controllers to meet your specific needs. Our PWM controllers feature Active Shield technology that optimizes battery charge and prevents overcharging.
Types Of BougeRV Portable Solar Panels
Solar panels come in a variety of designs meant to meet all the needs of any outdoor adventure. BougeRV.com has spent years developing the finest-quality panels and we stand behind them. These are the panels we use ourselves and we wouldn’t sell you a product we didn’t want ourselves. Here are some of our top picks that show how our panels can provide power for different scenarios.
Paso 100W Portable CIGS Solar Blanket
You will feel the difference between our solar blanket and others the moment you pick it up. Special CIGS (copper indium gallium selenide) solar cells are lighter, stronger, and more powerful than traditional photovoltaic cells. Unlike other designs, ours provide maximum voltage for as long as 20 years.
This panel is ideal for on-the-go adventures. It folds into a small package and includes a carry case. The lightweight panel is easy to transport and set up anywhere and offers superior performance.
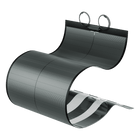
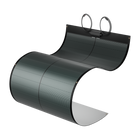
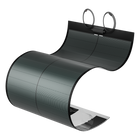
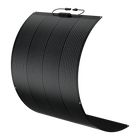
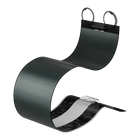
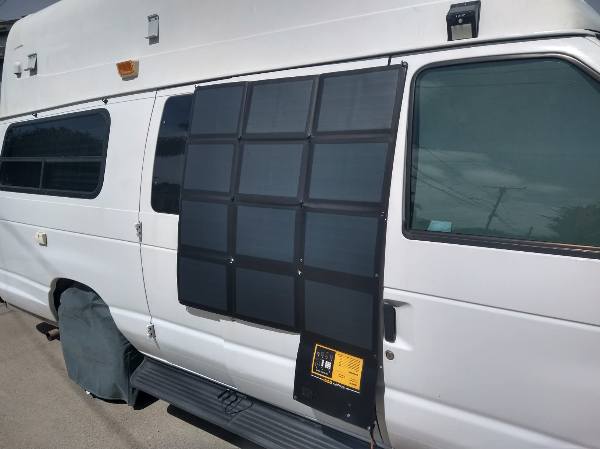
Yuma CIGS Thin Film Flexible Solar Panels

Our flexible thin-film CIGS solar panels are truly revolutionary. Using our decades of experience, we have developed a solar panel that can roll up for storage and will mount to any surface regardless of the curve.
These panels work wonderfully for mounting to rounded sides of motorhomes or curved decks of boats and are more durable than any other brand. It is perfect for temporary installation on car roofs, and tents, and works great at your campsite.
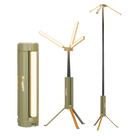
9BB Mono Solar Panel

Monocrystalline panels are among the most affordable options for adding solar power to your rig or campsite. Our unique design features 9BB cells that are more efficient than other designs. Our rigid 9BB mono solar panel provides optimal power even when partially shaded. The aluminum frame provides exceptional durability. This is a great choice for more permanent types of installations including motorhomes, boats, and cabins. Some of our customers use this panel for their hunting tree stand to provide quiet and consistent power.
We provide both 100w and 200w versions of the 9BB mono panels to match up with your project. The panels can be wired in parallel to provide optimum amperage or in series to maximize voltage depending on the conditions.
Conclusion
Connecting solar panels to charge a battery requires the right combination of equipment. BougeRV.com specializes in building the best solar charging systems including high-quality controllers and industry-leading solar panels. We offer individual components for building your custom system and packages that combine matching components to make choosing the best system as simple as possible.
We offer one last thing-customer service that goes above and beyond to offer solutions. If you are in doubt about how to connect your panels or unsure of what you need, we can help!
FAQs
1. Can I directly charge the battery from the solar panel?
No. Solar panel voltage varies and typically exceeds what a battery can handle. A charge controller is necessary to prevent overcharging and to optimize the charge rate. Connecting a solar panel directly to a battery can result in an explosion, fire, or severe injury. We offer controllers for any setup and package deals that give you everything you need to charge a battery with solar power.
2. How do you charge a 12V battery with a solar panel?
Charging a 12-volt car battery with a solar panel is simple when you use the components available from BougeRV.com. You will need a solar panel array, a PWM or MPPT charge controller, and the proper wires to make the connections. This article describes the proper order to connect a battery to a charge controller and then to solar panels.
3. What size solar panel to charge a 12v battery?
A 100-watt solar panel will provide enough power to charge a 12-volt battery. A PWM controller combined with a 100-watt panel will recharge a battery in 10 to 12 hours. An MPPT controller can reduce the recharge rate to about eight hours. Panels can be combined to increase the amperage or voltage for faster charge rates.
4. How many solar panels to charge a 12-volt battery?
The 100w 12V solar panels from BougeRV.com will provide enough power to charge a 12v battery and maintain the battery voltage even when you are using it. Combining panels can improve charge rates, but you need to connect the panels in the right order to prevent damage.
5. What kinds of batteries can be charged with a solar panel?
Most batteries can recharge using solar when using the proper controller. BougeRV controllers work with 12v up to 48v battery systems and charge lead-acid, sealed batteries, gel batteries, lithium batteries, and deep-cycle batteries.


